January 15, 2012

Brussel Sprouts

Brussel sprouts growing in the field


This year we've eaten more than ever out of our winter garden.  So far the fairly mild winter has allowed us to munch on carrots, parsnips, beets, brussel sprouts and even cabbage, spinach and swiss chard alongside the onions, potatoes and garlic and preserved veggies in storage.

One new favorite for us this year is brussel sprouts. I (Anna) had never seen them grow before and was taken by the fascinating little "cabbage trees,"  and Vince thought he didn't like to eat them.  And so it began- roasted brussel sprouts became the "thing to bring" to our family holiday gatherings and now we are experimenting with more ways to prepare them.  
Below is the recipe for the roasted brussel sprouts we have been requested to bring to family dinner:

Roasted Brussel Sprouts
  • 1 1/2 pounds Brussels sprouts (I've never weighed them, but about 2-3 "trees", ends trimmed and yellow leaves removed.   Cut an X in the bottom of each sprout for more even cooking. We also soaked them in water to get any "organic bugs" or tough dirt out.
  • 3 tablespoons olive oil
  • 1 teaspoon kosher salt
  • 1/2 teaspoon freshly ground black pepper
  •  whole garlic cloves (if desired)
1. Preheat oven to 400 degrees F  

2. Place trimmed Brussels sprouts, garlic cloves, olive oil, kosher salt, and pepper in a large resealable plastic bag. Seal tightly, and shake to coat. (or just mix well in a bowl.) Pour onto a baking sheet, and place on center oven rack.  
3. Roast in the preheated oven for 10-15 minutes, shaking pan every 5 to 7 minutes for even browning.  Brussels sprouts should be dark brown when done. Adjust seasoning with kosher salt, if necessary. Serve immediately.


Kielbasa and Brussel Sprouts

I also recently prepared kielbasa, sliced in 1/2 pieces and red onion in a little water in a cast iron skillet until the onion was transparent and then added brussel sprouts, cut in half, to the pan and cooked until the brussel sprouts were tender-crisp. This was so sweet from the onion but salty from the kielbasa that I didn't have to add any seasonings.  It is great served with mac and cheese:) 

    December 16, 2011

    Now where did we put those...? oh! In the fridge!

    This beauty is the newest addition to our hillside.  It is a refrigerator container that is serving as storage right now while we begin preparing for construction on the basement.   When we are finished, it will be cold storage for produce when we pack for the markets.  The future calls for a coat of paint and even a roof eventually to improve the aesthetic presentation. For now, we will just keep the jokes coming about pizza delivery and our graffiti tagged structure.

    November 21, 2011

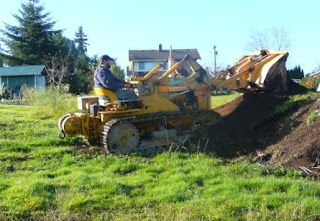
    Our New Crawler Tractor!

    Remember that tractor stuck in the mud last spring?  This will put an end to that, at least that's how Vince persuaded Anna and justified buying this track loader.

    Where else do you try out your new crawler than the smelly compost pile?
    Of course Pieter had to try out the new tractor without a steering wheel

    November 17, 2011

    a farmers market season

    We thought it would be interesting to see the progression of produce we offered at the farmers markets throughout the growing season. Between the two markets we usually have at least one picture a week of the full display. Posted here are various weeks in order from July to October.  They are not the best pictures of produce, but they are the ones that show the complete display and how we went from one table to three from July to October.


    November 4, 2011

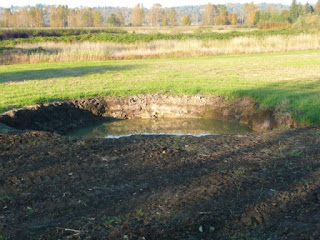
    Watering hole


    When Vern built the road for us, he needed a little extra material. It worked out great when he dug a small pond to get more dirt for the road. Now the runoff from the hillside can be directed towards the pond and we have a little habitat for wildlife and a beautiful pond to enjoy.

    October 28, 2011

    Tomatoes

    Giant tomatoes!


    When they're this fresh, you can eat a tomato like an apple (and you need to wear a bib!)


    Vince was proud of his tomatoes this year. Some of them grew to be really big and we were told by a wise, veteran tomato grower that the more cracks the more flavorful the tomato. They drew quite a bit of attention at the market. Unfortunately, they also grew attention from unidentified critters who liked to snack on them straight off the vine. We had a lot of tomatoes that we got to eat half of because something else had bitten into them. After the markets were over, an entire day was spent preserving tomatoes in sauce for use this winter.

    September 1, 2011

    Celery! (and a recipe too!)

    Vince was cautioned that it is very difficult to grow celery here and not to mess with it. So of course he had to try.  This year was attempt number two.  Unlike last time, it worked! We harvested beautiful, crisp celery.  It is darker green and smaller than conventional celery found in the supermarket, and a little sweet. And when cooked, it becomes even sweeter.  It was a hard sell at first, but after one week at the market, we had repeat customers the next week coming specifically to us for the crunchy green goodness. 

    After his suggestions for "ants on a log" were shot down, and unsure of the best way to preserve celery, Vince found a recipe for mirepoix. We were told by a customer that it is possible to blanch and freeze celery for use in cooking (it will be limp) and after more research, found that it can be dried or stored with the roots on in a root cellar. That being said, Anna had already chopped her way through this recipe that also called for more things we just happened to have around here: carrots and onions.  I'm told by my friend, Jeanna Stroble, who knows all things French, that you can also use olive oil in place of the butter.  We made large batches and froze it in portions for future use. Below is the recipe.

    Mirepoix

    A traditional French mixture containing finely diced carrots, onions, and celery, seasoned with minced herbs, and sauteed in butter is commonly called mirepoix (pronounced: "meer-pwah"). A bit of smoked meat is sometimes added to the dish to add flavor, small cubes of ham or bacon. A mirepoix is used to season stews, soups, sauces, and fricasses. It is also common to use it as a base for braising meats or fish.
    Ingredients:

    1 cup diced white onion
    1/2 cup diced carrot
    1/2 cup diced celery
    2 tablespoons butter 
    dash pepper

    Directions:

    Dice the onion, carrot, and celery in small, uniform pieces. Melt butter in a cast iron frying pan over medium heat. Add celery, carrot, onion, and pepper. Sautee until vegetables are tender.

    Here is what the website added:
    Mirepoix is great cooked with chicken or beef in a crock pot. With beef try adding some canned green beans and some diced tomatoes, with a bit of garlic, pepper, basil, oregano, and just a slim dash of cilantro.
    After frying pork chops, you can deglaze the pan by pouring in some of the mixture after the meat has fried and quickly removing the caramelization - do not allow the mirepoix to burn, but just pick up the flavor of the meat and caramel. A little can be poured over the chops like a sauce when they are served.
    There are many more ways of using mirepoix, the only limit is your imagination.

    Link to Mirepoix recipe and tips for preserving celery